July 19, 2013

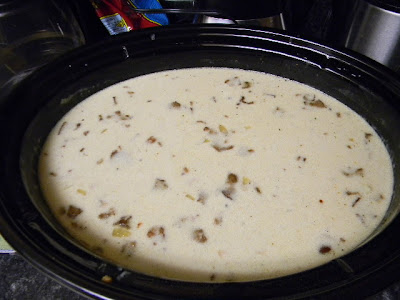
Bacon Clam Chowder

A few weeks ago, my Husband and I were able to spend some time just the two of us. It was nice to get away from the kids, our two year old and our dog, to just relax a bit. We honestly did not do as much relaxing as I had hoped but we did have a great time together. One day we went clam digging in Sequim, WA. If you are not familiar with Washington, it is on the upper edge of the peninsula boarding the Strait of Juan de Fuca just south of Victoria B.C. or more simply cold and wet most of the year. We managed to get enough Littleneck clams to make a double batch of clam chowder. This is all my husband's department because I really don't like shellfish. So here is his recipe for Bacon Clam Chowder!


Bacon Clam Chowder
60-80 Clams
      4 Large Russet Potatoes (Peeled and Diced)
      1 lb Bacon
      1 Large Onion (Diced)
      1 Pint Half-and-Half
16 oz Clam Juice (Bottled or use juice left from cooking clams)
      2 T Salt
      2 T Fresh Ground Pepper
      2 T Old Bay Seasoning


First you will need to clean the clams in cold water and then boil until they are cooked through. Once they open their shells they are done. You can take the clams out then scoop out the meat from inside. (You can add some extra seasonings at this point)

While the clams are boiling, peel and dice potatoes. Boil until tender but not falling apart then set aside.


Once all the shells are cleaned of the meat, you can discard.Cut the clams into bite sized pieces then set aside.


Cut bacon into 1/2" -1 " pieces then cook in frying pan. Set aside on paper towel to soak up any grease.


Drain all grease from pan except 2 tablespoons. Add the onion into the grease until onions soften and become translucent.

I large pot add half and half, clam juice and seasonings over medium heat until well combined. Add onions then gently stir in clams and potatoes. Bring to boil, time for 5 minutes. Yields about 12 servings.

You are now ready to eat! Serve with a light salad and bread or crackers.We hope you enjoy this chowder and would love to see your pictures and feedback about this recipe.


~Connect with me ~ 


Facebook : Chee Chee and Company


Youtube : HandmadebyKristen

Twitter: Handmadebykris


July 18, 2013

Cherry Pineapple Marmalade

This last week my wonderful husband surprised my with about 40 pounds of cherries he picked from a friend's property. I was planning on not doing anything aside from simply eating cherries this year to help cost costs so this was exciting and a little overwhelming all at the same time. I usually try to plan out what I am going to preserve for our food storage for the year to come at least a few weeks in advance. So after I got a stomach ache from eating too many, I decided I better figure out what we will do with the other 39 pounds.

I started by looking through my trusty Ball canning book circa 1966. It has some great recipes that are hard to find and tips for canning. I came across some cherry preserves and marmalade so I thought I would give it a try. Check out the video below on how to can Cherry Pineapple Marmalade.


For this recipe you will need:
2 C Cherries (I used 1 C Bing and 1 C Rainier)
2 C Crushed Pineapple
2 C Evaporated Cane Sugar

Measure out your sugar and set aside.

Pit and crush cherries into small pieces. (I used a food processor to pulse a few time)

Strain most of the juice from your pineapple and cherries.

In large pot, stir sugar into fruit then bring to a boil. 

Once your fruit has reached the boiling point time for 10 minutes.

Pour into hot jars, top with lids and rings then process for 10 minutes.

This recipe yields approximately five half pints. The Ball book stated that it would yield three half pints so I was a little surprised when it filled more. Next time I think I will try to get more juice out of the fruit before cooking to see if that makes a difference in the yield. Also measure the fruit when it is whole to see what difference that will make. Please let me know if you try this recipe and what you think! 
Thank you for reading and watching!

~Connect with me ~ 


Facebook : Chee Chee and Company


Youtube : HandmadebyKristen

Twitter: Handmadebykris


Toasted Coconut

I love using coconut in different foods and treats. We use coconut oil for just about everything in our house but I am still learning to work with actual coconut. We live in a place where they really don't grow so I don't get many fresh coconuts. The other part is that I don't know what I am doing, but then again I usually make things up as I go anyway. So from one maker to another, just go with it!

I have dried coconut in the dehydrator once before, but have never tried toasting coconut until now. You can click the Dehydrated Coconut link if you are interested to see how I did that. In order to toast your own coconut you will need a pan with edges, like a cookie sheet, and some coconut. I just got mine from the bulk section at my local grocery store. It was labeled as "unsweetened" shredded coconut.


Spread out the coconut in a thin layer across your pan. Use as much as you will be able to fit in your pan at one time without it being layered. Turn on your oven to a low bake setting. (I used 200 degrees Fahrenheit). You will need to keep a close eye on your coconut while it is baking because it can get too hot very easily due to the natural oils.

Place pan into oven for 10 minutes or until outer edges of coconut layer becomes a tan color. Remove pan then gently toss coconut. Shake pan to even back out and put back in oven for another 10 minutes. Repeat this step once more or until all coconut is toasted to your liking. Once done, let cool completely then use or store in glass container.


I used toasted coconut and almonds on my most recent batch of date rolls, they were delicious! Let me know if your try this method or if you have found another way that works for you!


~Connect with me ~ 


Facebook : Chee Chee and Company


Youtube : HandmadebyKristen

Twitter: Handmadebykris

July 04, 2013

Tie-Dye and Marbled Cookies

For the fourth of July we were invited to some friend's house. I had been asking my husband the last few days if there was anything we should bring. He kept saying no, but I was not satisfied with that answer so I kept asking.
Finally he asked them, or at least told me he asked them to shut me up, and they said cookies would be great. So I got to work 2 hours before we were leaving. Seeing as how it was a holiday after all, I thought I would be patriotic and make marbled and tie-dye cookies. Marble to stand for the pillars which hold up the capital buildings and tie-dye to represent the free spirit with in me and a country that gives me the freedom to write things like this blog.


Not really, I was just making up the design as I went along, but that sounded pretty good right? So to make these cookies you will need to make a rolled out dough cookie. I used a sugar cookie. If you need a recipe here is link to my Sugar Cookies. You will also need food coloring and a cookie cutter.


Prepare your dough and roll out according to directions. For tie-dye cookies blot food coloring onto the dough surface randomly then cut out cookies. 

***
You may want to sprinkle with some sugar to hide any odd taste from the coloring.
***

 For the marbled look you can just roll your left over dough back into a ball then roll back out. Once rolled out it should looked marbled because of the food coloring. You can do this same effect with separating the dough into two or more pieces and coloring each individual section. Then roll back into one ball and roll out flat to cut.


Bake cookies according to recipe and enjoy! Please let me know if you try this method. I would love to see your pictures!

~Connect with me ~ 


Facebook : Chee Chee and Company


Youtube : HandmadebyKristen

Twitter: Handmadebykris